So, you have decided to wax your upper lip and eyebrows at home. But before you “dive in” and just start waxing, we suggest you read our useful tips and how to below.
Which wax is suitable for facial waxing?
We recommend Italwax Film Wax as opposed to Cold / Strip wax as these are specially formulated for sensitive areas and will remove any type of hair regardless of its length. You surely do not want to wax an area on your face more than once and walk around with red patches all day!
Do not use Cold / Strip wax on your face – these waxes are intended to remove hair on large areas, will not remove small fine hair and are not suitable for sensitive skin.
What do I need to do facial waxing?
First, we suggest you invest in a wax warmer / heater like Italwax Glow Kit. This heater has been specifically developed for film wax and will heat your wax to the correct temperature. (No temperature dial as all our Film Waxes heat at the same low temperature to ensure no burns)
The Glow Wax Kit contains everything you need and with 2 x 80g wax you will be able to do up to 60 upper lip waxes. Kit contains - 1 wax heater with power cord, 1 removable aluminium capsule (already inserted in the wax heater), 2 80g bags of hot film wax in granules,2 sachets of cosmetic talcum powder, 1 small bottle of “pre wax gel”, 1 small bottle of “after wax emulsion retardant effect”, 20 disposable wooden spatulas “Medium”, 10 disposable wooden spatulas “Eyebrows”, 1 instruction leaflet, 2 sachets of “wax warmer cleaning wipes”.
All items (except heater) also sold individually in a larger size.
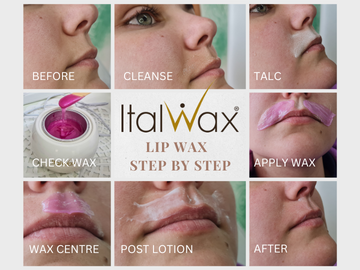
How to do an upper lip wax?
- Cleanse area with Italwax Pre-wax Gel. Place a small onto a cotton pad and wipe area to be waxed. Take clean cotton pad and wipe area dry.
- Apply a small amount of talc, either with you finger, earbud or cotton pad. Do not use perfumed or baby powder as this can cause allergic reaction, clogged pores, or outbreaks.
- Now test that your wax is at the correct temperature – when lifting with a spatula it should have the consistency of toffee / fudge. (80g of wax takes 20-30 minutes to be at the correct temperature and consistency)
- Lift a small amount of wax with the spatula and apply onto the area. (Ensure to apply medium pressure with spatula to ensure wax “grips’ hair.) Our film wax can be applied in any direction, but we do recommend you apply from inside outward on right side.
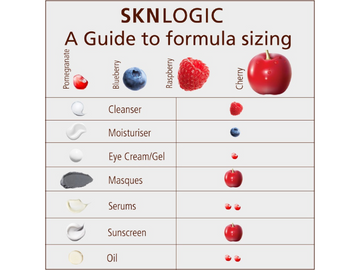
Do not apply too thick - Thickness of 1-2mm is all you need.
Apply to the other side as well leaving a gap in the middle underneath the nose. Wax takes 6-8 seconds to “harden”. Pull the skin tight and lift wax from outside and pull towards inside. Ensure to pull “sideways” and not upward. Immediately place your hand over area to soothe. Repeat for other side. Apply small piece of wax in middle and remove once ready.
- Apply Italwax After Wax Emulsion onto area – this will soothe and alleviate any redness (if any). Never use oil based after wax products on the face – this can cause clogged pores, outbreaks.
Please Note
- We do not recommend offering waxing services to others if you are not qualified.
- Never wax over an area which are sunburnt, irritated or have open wounds.
- Do not wax after a bath, sauna or a chemical peel treatment.
- Do not wax at all if you are on acne treatment.
- Never wax over moles or warts – wax around it.